Showing posts with label vegetarian. Show all posts

Wednesday, April 28, 2010

recipe: now is the time to eat your lawn

Every spring, for the past several years, I've been telling myself: "Mark, eat the dandelions in your yard. They're so good for you and I bet they taste great. The co-op is selling them for $3.00 a bunch!" It's a fleeting thought that evaporates with the summer heat, when the dandelions morph from almost-pretty spring flora into desolate, dried-up, seed dispersing weeds. With a new baby and toddler in the house, my approach to lawn care has dropped to historically low levels, if it can be considered "care" at all. The upside is that my small city lot is, quite honestly, a dandelion farm. During times of famine, Italian schoolchildren were sent to the fields to gather wild greens, so why not harvest some from your (chemical free) yard?

This reality most certainly keeps my neighbors up at night, but they're missing out. In fact, they're likely chatting, nervously, about my lawn over a bag of pre-washed lettuce from sunny California. At this time of year, at least in MN, the dandelions are lush and tender, the flower heads just beginning to emerge. Dandelion greens are a great substitute for spinach or arugula, so you can prepare them as you would any other dark leafy green, such as chard, kale, collard green, etc. They even taste great in a salad with vinaigrette.

recipe: sautéed dandelion greens
In recent months I've resorted to increasingly minimalistic techniques to put fresh food on the table quickly, while keeping two little ones out of trouble. Consequently, this recipe doesn't break any new ground, but it will give you an idea of how easy it is to prepare utilitarian sautéed greens, which make an excellent first course, side dish, or leftover ingredient for other dishes like omelets and quiches. It's also an excuse to put down the laptop and weed your yard or garden.

Note: Like spinach, dandelion greens will wilt to a mere fraction of their initial volume, so you can cook a lot of them at once. Just make sure you have enough of the other ingredients to season them well.

Ingredients

  • One large bunch of trimmed, washed, and roughly chopped dandelion greens (two big fistfuls)
  • 2 cloves of garlic, thinly sliced
  • olive oil
  • balsamic vinegar
  • red pepper flakes (optional)
  • coarse salt and freshly ground pepper
Technique
  1. Heat a few tablespoons of oil in a skillet. When smoking, add the garlic and optional red pepper flakes. Cook until garlic is very fragrant (but not brown), about 30 seconds.
  2. Add the greens and stir them quickly as they wilt. Cook until greens are still bright in color, but quite tender (3-5 minutes).
  3. Add a few splashes of balsamic vinegar (to taste), season with salt and pepper, and serve immediately.
*Serves 2-4 as a side dish

Friday, January 22, 2010

recipe: winter herbless pesto

As you may have noticed, I haven't written nearly as much over the past few months, and the recipes I've published are quite spartan. This is because we had our second child, a boy, in October, and it's hard enough to cook something healthy, much less write about it. However, I am learning a lot about (and practicing) fast, wholesome, winter meals, such as the broiled eggs I wrote about earlier this month. Some people fall to convenience foods during such times, but I choose to strip down my cooking even more.

Yesterday I think I perfected what may be the perfect two-young-children-cold-winter-weeknight-that-you-could-still-serve-company meal: pasta with an herbless pesto sauce. One of the many challenges of cooking with small children is a sudden decrease in trips to the co-op. Combine that with a lack of fresh local produce, and one begins to find new romance in the pantry. After you make this one time you'll be able to make it blindfolded, without a recipe or planning.

Ingredients

  • 1 pound dried pasta (whole wheat spaghetti or penne taste great with this)
  • 1 large garlic clove
  • 1/4 lb parmesan or other hard cheese, plus more for grating
  • 1 heaping cup of walnuts, toasted
  • 1/2 cup olive oil
  • 1 tsp dried oregano
  • 1 tsp coarsely ground black pepper
  • pinch of sea salt
Techinique
  1. In the small bowl of a food processor, fitted w/ a blade attachment, combine garlic, cheese, walnuts, oregano, pepper, and salt. Pulse until the mixture resembles coarse breadcrumbs.
  2. Turn the food processor on and add olive oil until mixture resemles an oily paste (much like basil pesto).
  3. Cook pasta, drain, and toss briefly with the pesto sauce. Top individual plates with grated cheese.
*Serves 4 as a main dish or 6 as a first course.

Friday, September 11, 2009

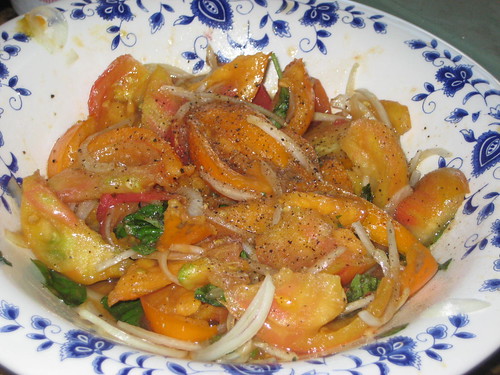
reicpe: french tomato salad

During the juicy splendor of late summer/early fall, insalata caprese is often the default mode of consumption for fresh slicing tomatoes. It is a truly wonderful salad. However, to add some variety to your repertoire, culturally and technique-wise, try this minimalist French version, which is more or less the same recipe that appears in Anthony Bourdain's Les Halles cookbook.

recipe: french tomato salad (salade des tomates)
*Serves 4 as a first course salad, or 6 as a side.

ingredients:

  • 2 lbs perfectly ripened heirloom tomatoes (don't mess around)
  • 2 shallots or one very small onion, sliced paper-thin
  • handful of basil or parsley leaves, cut into chiffonade
  • 1 garlic clove, slightly smashed
  • very coarse sea salt (fleur de sel would shine here)
  • coarsely ground black pepper
  • strong tasting olive oil (my new favorite is Napa Valley Naturals)
technique:
  1. Using a very sharp chef's or tomato knife (I'm not a fan of specialty knives, but this is a useful one), cut the tomatoes in half, remove the cores, and slice the halves into wedges.
  2. Place tomatoes in a large colander (positioned over a bowl or the sink) and sprinkle with a good amount of salt (a word of caution: salt preferences vary, and you will brush some of it off later, but don't go overboard the first time you make it. You can always add more salt before serving). Let them sit at room temperature for 10-20 minutes. Water and seeds will begin to drain through the colander.
  3. Put the sliced shallots or onions in a small bowl and sprinkle with salt. Let them sit with the tomatoes.
  4. Remove tomato wedges from the colander, scraping any loose seeds out with your fingers, and put them in a wide, shallow serving bowl or dish. You also can brush off any large granules of salt.
  5. Add sliced onion/shallot to the bowl, brushing off any excess salt.
  6. Add the basil and drizzle everything with a generous amount of olive oil. Then drizzle with a smaller amount of vinegar. The key here is to minimize the amount of liquid in the salad, as you want the flavors to be intense. The tomatoes should absorb most of the oil and vinegar, and release a minimal amount of juice into the bowl.
  7. Toss lightly with a spoon, top with black pepper, check seasonings, and serve.

Friday, August 21, 2009

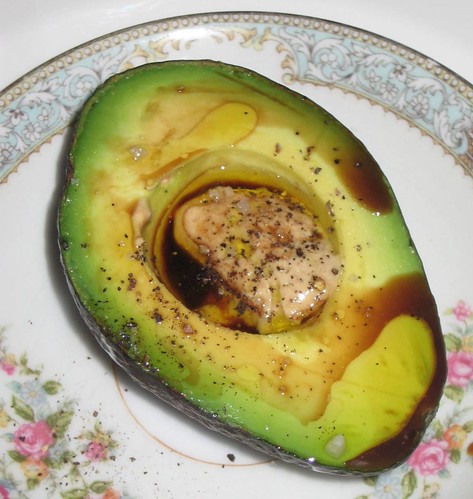
anti-recipe: f'in simple avocado hors d'oeuvre

Rule #1: Don't freak out about hosting friends or family for dinner. Your boss, priest, or Secretary of Defense? Sure. Your best friends? Non.

Rule #2: Cooking and eating are fun, so enjoy the process as well as the results.

Rule #3: Make something that is easy. This will give you more time to clean your bathroom and have an apéritif prior to your guests' arrival. Both of those things are important. This avocado dish is good practice.

I first tasted this exquisitely simple creation as a student in southern France. I know, it sounds pretentious, but as a French major it was necessary to learn grammar in person and increase my vocabulary of regional foods and drink. This included, among other adventures, spending a couple weekends at a French friend's parents' home in Landes. Seeing that I am quite a large individual, my friend's mother immediately implied that the size of my appetite must surely equal or exceed that of my physical stature. She was not mistaken.

As part of a massive late spring meal, she served avocados, halved lengthwise on small plates. She put a small amount of hot Dijon mustard in the center of each, then drizzled some balsamic vinegar and olive oil, and sprinkled some coarse sea salt and black pepper. Just looking at these made me excited. As a Minnesotan, I was not accustomed to eating many avocados, and surely not as an elegant hors d'oeuvre. Eat them with a small spoon and watch your guests drool.

What is this preparation called, you might ask? I do not know. She may have referred to them as "avocats" (avocados), because French people eat stuff like this every day. Let's give it a sophisticated name, to score you points. How about "avocados balsamiques?"

Thursday, July 2, 2009

are you eating muesli, the ultimate summer breakfast?

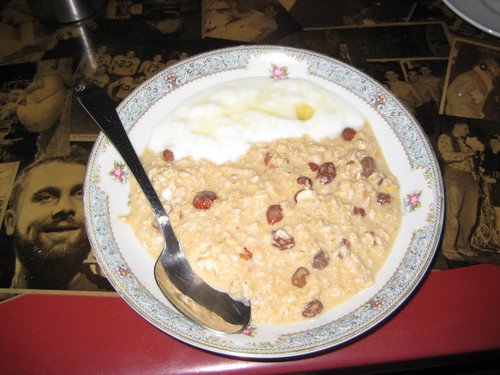
My wife found a delicious recipe for meusli, a euro-type breakfast, in a cookbook you may not know about. Feeding the Whole Family: Cooking with Whole Foods, by Cynthia Lair, is a very accessible collection of recipes emphasizing simple meals with healthful, seasonal ingredients (parents may remember Cynthia as a food writer/editor for Mothering Magazine). Don't confuse muesli with Mueslix, the dorky brand of Kellogg's cereal from the 80s. Real muesli is a simple breakfast of rolled oats (or other grains) and any combination of nuts and dried/fresh fruit. It's basically granola that hasn't been toasted. There are two styles: dry and soaked. In the dry version, muesli is eaten as is, with milk or yogurt. In the soaked version, the muesli is first allowed to sit in hot water or juice for a few hours or even overnight. Both are delicious, but we were intrigued by the soaked version as it produces a filling breakfast that can stand in for oatmeal in the summer. Despite the use of boiling water in the recipe below, the texture of soaked muesli is not the same as oatmeal. Give it a try this summer. It will keep your mornings sane and your kitchen cool.

Orange Hazelnut Muesli

Prep time: 10 minutes (excluding overnight soaking)

Ingredients

  • 2 cups rolled oats or rolled barley (or some of both)
  • 1/3 cup hazelnuts, chopped
  • 1/3 cup raisins
  • 1/2 teaspoon ground cinnamon
  • 1/2 teaspoon sea salt
  • 2 cups boiling water
  • 1 cup freshly squeezed orange juice
  • Optional toppings: sliced fruit, berries, raisins, plain yogurt w/ honey
Technique

Place oats, hazelnuts, raisins, cinnamon, and sea salt in mixing bowl. Pour boiling water over mixture and stir. Add orange juice to mixture and stir again. Cover bowl with plate or cloth and allow moisture to soften grains 6 to 8 hours or overnight. Top apple, pear, berries, and/or yogurt.

*Makes 4 servings


Monday, June 15, 2009

another way to make potatoes on the grill

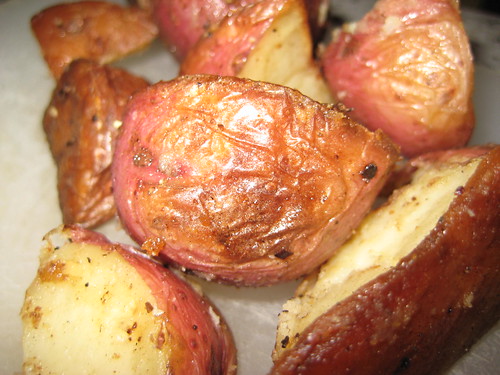
Fried potatoes are delicious and fast, but the thought of heating up the kitchen on a punishingly hot day makes me want to vomit, seriously. Some of you might remember that last summer I posted a recipe for roasted potatoes on the grill. While that version is delicious in its own right, the indirect grilling method requires at least 30 minutes to fully cook the potatoes. In an effort to create a more weeknight friendly version, I developed another recipe inspired by a recent Mark Bittman article about grilling over wood coals, in which he describes how one of his friends uses a cast iron griddle to sear foods over hot coals.

I applied this technique to quartered new potatoes, and the results exceeded my expectations. A screaming hot skillet, combined with the ambient heat from a covered grill, resulted in potatoes that were crispy on the outside, creamy within, and subtly infused with smoky goodness.

ingredients

  • 2.5 pounds small red new potatoes, quartered or cut into 1 inch pieces (I'm sure other small potatoes would work well)
  • 8 large garlic cloves
  • high quality olive oil (4 tbsp)
  • sea salt
  • black pepper
equipment
  • large cast iron skillet
  • a round metal tray, tin foil, or something that will loosely cover the skillet
  • charcoal grill
technique
  1. Ignite a full chimney of charcoal.
  2. While charcoal is heating, pour olive oil into cast iron skillet.
  3. Once coals are hot, pour them in a thick layer over 1/2 of the grill. Place the skillet on the grill grate, cover, and heat until oil is smoking.
  4. Add potatoes, loosely cover the skillet, and cover the grill.
  5. Cook for 10 minutes, then check potatoes for browning.
  6. If the bottom sides are golden brown, flip potatoes with a spatula to brown remaining sides, and add garlic cloves. Cook 10-15 minutes longer.
  7. Once potatoes are brown and crispy, remove from heat, toss w/ salt and pepper, and serve immediately.
*Serves 4 people.
*Cooking time is highly variable based on the amount of coals used, type of skillet, etc., but this is a good guide.

Monday, December 29, 2008

think of kale, especially when it's -5 outside

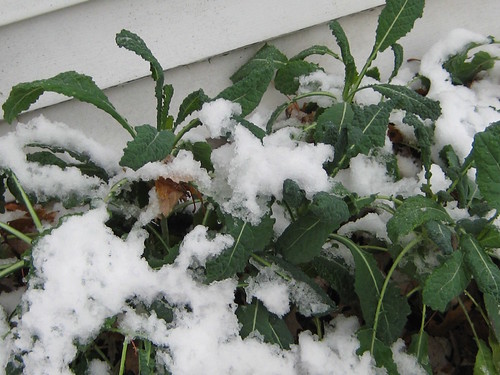
I think about kale a lot, perhaps too much. It's an underrated vegetable for sure, and its resilience to cold and frost deserves some serious respect. I took this picture about six weeks ago in mid-November. By that time, St. Paul, MN experienced two frosts and one snow storm (when I took this picture). I harvested it the same day, to make sure we did not push our luck.

If you live in Minnesota, you know that gardens typically do not support life into November, with the exception of a few lucky pumpkins or squash. I planted this purple lacinato kale, an Italian heirloom variety, in late summer in preparation for a fall harvest, since it's always exciting to have a few things to eat after the August/September vegetable rampage. The other day it was -5 at 12:00 pm. It's amazing to think that only one month and a half has passed since eating the last gift from the garden. These thoughts keep me warm during the arctic months.

I've posted my favorite kale recipe below. Tuck it away for next season. Now, if you live in the Upper Midwest and you want to cheat, you could buy some California kale, which is in season right now, but it certainly won't be the same as brushing the snow off your own crop.

This recipe serves 4 as a side dish.

ingredients

  • 2 large bunches of kale, trimmed of tough stems
  • 1 head of garlic
  • 1 teaspoon hot red pepper flakes
  • ground black pepper
  • sea salt
  • olive oil
  • balsamic vinegar
technique
  1. heat the oven to 375 degrees
  2. wrap the garlic in foil and roast for 45 min to 1 hour - garlic should be soft and golden brown. set on the counter to cool.
  3. while garlic is roasting, bring a large pot of water to boil and add a big pinch of sea salt.
  4. put the kale in the pot and blanch for 3-4 minutes, until thickest part of leaves is tender (but not mushy!).
  5. remove kale from pot, put it in a colander, and run cold water over it until it's very cool to the touch.
  6. using a clean dish towel, squeeze all of the water out of the kale, then pull the individual leaves apart.
  7. when garlic has cooled, slice the top of the head using a sharp serrated knife and squeeze garlic into a small bowl (it should be nice and pasty at this point). add a pinch of salt and black pepper.
  8. heat two tablespoons of oil in a small skillet. when the oil is hot, add the red pepper flakes and garlic, stirring constantly for 1 minute to keep them from burning.
  9. add the kale and saute for 3-4 minutes until hot. remove from heat and stir in a splash of vinegar and another pinch of sea salt. Serve hot or luke warm.

Sunday, December 21, 2008

depression = polenta and fried eggs


If my last recipe wasn't thrifty enough for you, then hold on, because this is about as cheap as one can possibly eat. Everyone is saying that the economy will only get worse, so enjoy potato leek soup while you can - it may soon be a luxury.

Every so often, our family faces an empty refrigerator, and just when we're about to order pizza or consider going out, we go back to this recipe as an extremely simple, delicious meal from pantry staples. Polenta, or grits if you live below the Mason-Dixon, are a true blessing to the weeknight chef. Otherwise known as coarsely ground cornmeal, polenta is available at any grocery store, and many co-ops offer it in their bulk sections. It keeps in your pantry indefinitely, so it's an item every home chef should have on hand. Also, if you live in the Midwest, polenta is often ground from local corn - a good way to continue eating locally during the cold winter months.

Aside from olive oil and parmesan cheese, the only other ingredients you'll need are eggs. At around $3.00 per dozen, organic eggs are perhaps the cheapest source of animal protein available to the frugal locavore. You could save money buying conventional, manufactured eggs, but once you learn about the conditions in which those birds live, you'll be happy to shell out an extra dollar for some ethical, quality product. Besides, if you eat eggs as a way to cut down on the amount of meat you buy, spending a little extra should not be a big deal.

I saw this specific recipe in the NYT's Dining section, which is an excellent source for simple meal ideas (especially the Mark Bittman articles). Serve it with a salad or some sauteed greens for a complete, balanced meal.

This recipe serves 4 people.

Ingredients:

  • 4 1/2 cups low-sodium broth or water
  • 1 1/2 cups polenta (not quick-cooking), coarse corn meal or corn grits
  • 3/4 teaspoon salt
  • 2 to 4 tablespoons butter
  • 1/4 teaspoon freshly ground black pepper, more to taste
  • 1 1-ounce chunk or 1/4 cup grated Parmesan cheese
  • 2 tablespoons olive oil
  • 8 large eggs
  • Coarse sea salt for garnish.
Technique:
  1. In a large pot, bring broth or water to a simmer. Stir in the polenta and salt. Simmer, stirring frequently, until thickened to taste, 10 to 20 minutes. Stir in butter and pepper; cover pot to keep warm.
  2. Using a vegetable peeler, slice cheese into slivers, or grate it on largest holes of a box grater.
  3. In a large skillet, heat 1 tablespoon olive oil until very hot. Fry 4 eggs until edges are crispy and yolks still runny. Repeat with remaining oil and eggs.
  4. Pile polenta into 4 bowls and top with cheese and then fried eggs. Garnish with sea salt and more pepper and serve.

Monday, December 15, 2008

recession = potato leek soup

During a recession, many people look critically at their grocery bill as an opportunity to cut costs. This is a good idea, as long as you don't sacrifice healthy, seasonal, high-quality products for mass produced items at a lower cost. Rather than use the economy as an excuse to stop shopping at the co-op, perhaps you should rethink exactly what you're buying, and how you're preparing it. For example, you could eat less meat, or purchase seasonal produce that typically costs less than off-season delicacies (such as strawberries in January, which you shouldn't be buying in the first place). If you live in northern climes, your choices will be limited, but the payoff is huge, both economically and emotionally.

If a bull market is steak and lobster, then a bear market is potatoes and leeks, preferably in the form of soup. With a dollop of butter or sour cream, and some good bread, this soup is a filling winter meal that costs less than a six pack.


Millions of people have survived on the potato alone. If you have access to water and some onions or leeks, a whole world of flavor awaits. This recipe appears on the first page of Julia Child's epic "Mastering The Art of French Cooking," and with good reason. The simple combination of inexpensive, seasonal vegetables embodies the frugality of peasant cooking without sacrificing flavor. More importantly, excluding salt and water, this recipe only has two ingredients. It is the easiest soup recipe I've ever made. Anyone can and should make homemade soup. No excuses.

This recipe serves 6 people.

ingredients:

  • 1 lb peeled potatoes, thinly sliced (any variety will do, but I like Yukon Golds)
  • 1 lb thinly sliced leeks, or sweet onions, thinly sliced (white and light green parts only)
  • 2 quarts water
  • 1 TB salt
optional:
  • 3 TB butter
  • 3 TB minced parsley or chives

technique:
  1. bring water to boil in a large soup pot
  2. add salt and vegetables, bring to boil
  3. lower heat and simmer, partially, covered for 40-50 minutes
  4. turn off heat, and using a potato masher or empty beer/wine bottle, puree the vegetables in the pot by pressing them against the bottom of the pot (this is much easier than it sounds)
  5. if using butter and herbs, stir them in and serve immediately. a dollop of sour cream on top also works well.

Saturday, August 30, 2008

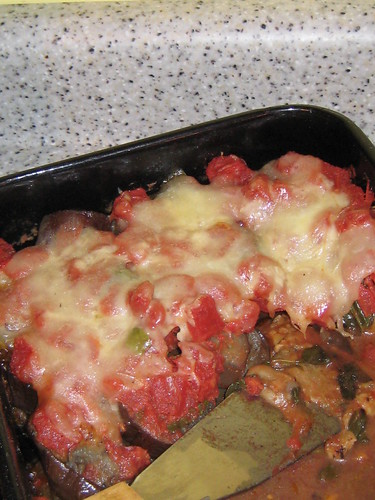
recipe: eggplant parmigiana on the grill

The haphazard success I achieved making roasted potatoes on the grill has inspired further experimentation with using a charcoal grill as an oven. As mentioned last time, baking/roasting food on the grill, in place of your indoor oven, keeps your house cool during the hot months. It also maximizes the amount of heat you actually use from your coals, since the most common use of charcoal is high heat, short term, flash-grilling for steaks, sausages, vegetables, etc. It's surprising how long a briquette will generate heat, so put that energy to good use by slow-cooking something before you flip the burgers.

How it happened: yesterday I realized there was a bag of slender, pale-purple eggplants sitting in my fridge, just waiting for a simple summer preparation. My brain immediately leaped to a seductive recipe for eggplant parmigiana in one of my favorite Italian cookbooks, for which the ingredients and technique just begged for smoky hot coals. Moreover, it's not comfortable or convenient to set up a chaise longue in the kitchen, so do yourself a favor and bake this on the grill while soaking up some shade.

Ingredients:

  • 2 pounds eggplant (any variety), sliced into 1" disks
  • 2 15 oz cans of diced tomatoes (good ones)
  • 1 bunch basil leaves
  • 4 cloves garlic (slightly crushed)
  • .5 lbs fresh mozzarella cheese, cut into 1/2 inch cubes
  • 1/4 cup grated parmesan cheese (don't even think about the green can from Kraft. if you live in the midwest, try Sartori Parmesan from WI - it's a local alternative to the real stuff from Italy)
  • olive oil
  • salt
  • pepper
Technique:
  1. Start a full chimney-load of charcoal.
  2. While coals heat up, coat the bottom of a deep-sided baking pan (brownie pan works well) with about 2 tbsp olive oil.
  3. Layer eggplant slices in an orderly fashion across the bottom of the pan - you may need to or three layers to fit all the eggplant. Grind some pepper over the top and drizzle with some more oil. Stuff the garlic cloves randomly into the eggplant layers.
  4. When coals are hot, deposit them on one side of the grill, making a tidy-looking pile (you may need to use some tongs).
  5. Set the baking pan on the grill grate directly over the coals. Cover grill, open vents, and let it cook for about 12-15 minutes.
  6. Remove grill cover and check the color of the eggplant, it should take on a light brown color at this point (if it still looks raw you'll want to leave it on for another 5-10 minutes). You should also use a tongs to check one of the bottom slices, to make sure they're not burning.
  7. Once the eggplant has browned slightly, remove it from the grill and add another 10-15 charcoal briquettes to the existing pile (this is important, as it keeps the grill hot).
  8. Layer the basil leaves on top of the eggplant. Then pour the diced tomatoes over the basil. Then add the mozzarella and parmesan.
  9. Put the pan back on the grill, but on the cool side. Cover grill and roast for 25-30 minutes, or until cheese is melted and bubbly. Make sure you don't peek at the dish too early, because each time you lift the cover you release the heat from your grill.
  10. While patiently waiting for cheese to melt, prepare the remaining elements of your meal, which you can cook over the hot side of the grill once the eggplant is done - you should have plenty of heat left in the coals.
  11. Congratulate yourself on yet another rustic, yet elegant, grilling victory.

Sunday, August 3, 2008

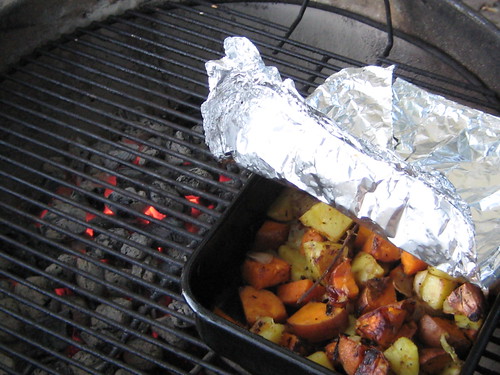
recipe: roasted potatoes on the grill

In a rare moment of clairvoyance, I invented this recipe in an effort to enjoy roasted potatoes without turning on the oven. Root vegetables taste great (and are inexpensive) year around, but it can be a challenge to prepare them during the summer, as the kitchen can become a real sweat lodge. I've listed the ingredients and technique below, but you'll quickly realize that a cave person likely came to the same conclusion. This recipe begs for variation and experimentation. Go wild.

Ingredients:

  • 2.5 pounds potatoes, scrubbed and cut into 1-2 inch pieces (I used Yukon golds, but any variety should be fine)
  • 1 onion, roughly chopped
  • 4 cloves of garlic, lightly smashed
  • chopped leaves of one rosemary sprig
  • olive oil
  • black pepper
  • kosher salt
Technique:
  1. Light a chimney-load of briquettes. While the coals are heating up, locate a deep, heavy roasting pan (see picture) that can handle high heat.
  2. Coat the bottom of the pan with olive oil - this will keep the potatoes from sticking
  3. Combine all of the ingredients in the pan, drizzle with more oil, and toss to evenly distribute oil, herbs, salt, and pepper. Cover it with tin foil.
  4. Once charcoal is ready, dump it onto one side of your grill - make sure it's relatively flat and not heaped in a pile.
  5. Place the pan on the grill grate directly over the coals and cover grill. Let it cook for 10-15 minutes. The goal of this step is to fry the potatoes, so you should hear a sizzling sound after a few minutes of cooking.
  6. Check the potatoes by lifting the tin foil - if the bottom layer is browning, use a spatula to toss them. Replace foil and continue frying for 5-10 more minutes.
  7. Have a drink.
  8. Once you get a nice brown color on most of the potatoes, slide the pan to the cool side of the grill - cook, covered, for at least another 10-20 minutes, or until the potatoes are fully roasted and tender.
  9. Have another drink, and enjoy your effortless grilling mastery.
There are several beautiful elements to this recipe, the main one being that you don't really have to pay close attention to it (as long as you know when they're browned and not burned). And you can leave the pan on the cool side of the grill for quite a while, which is especially helpful if you're going to use the hot coals for the rest of your meal, be it vegetables, hamburgers, sausages, etc.

Sunday, July 1, 2007

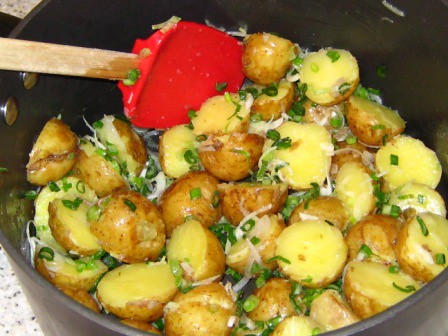
recipe: steamed potatoes with butter and green onions


This is so easy it's a joke.

Ingredients:

  • 2 pounds of baby potatoes (yukon gold or red)
  • 4 green onions (or 3 spring onions), thinly sliced
  • 4 tbsp quality butter
  • kosher salt
  • black pepper
Preparation:

1. Wash potatoes and, using a steamer insert or other contraption, steam them in a large pot for 8-10 minutes until tender (don't overcook, they should still be firm and the skins intact).

2. Drain potatoes and place in the now empty/dry pot. Slice them in half and toss with the butter to evenly coat each piece of potato. Mix in the green onions and salt/pepper. Serve hot, luke warm or room temperature.

*They reheat well, so feel free to make enough to have leftovers.

*No recipe source? Nope. This is a HOUSEKEPT original, sucka. Who cares if it only contains 3 ingredients? I don't. And you'll love us for it.

Friday, June 29, 2007

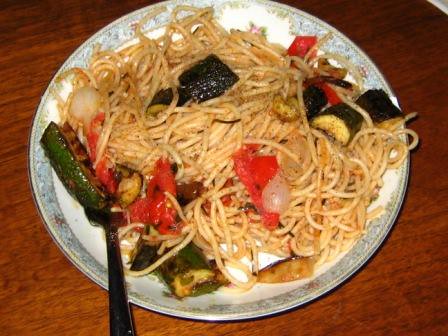
recipe: spaghetti with tomatoes, chives and basil

*Serves 4 (dinner portions) or 8 (first course portions)
*I copied this recipe from
Mario Batali's "The Babbo Cookbook."

Ingredients:

  • kosher salt
  • 1/3 cup extra-virgin olive oil
  • 8 garlic cloves, thinly sliced
  • 2 pounds small tomatoes (the best you can find in season)
  • 1 bunch chives, cut into 1-inch lengths
  • 1 bunch basil leaves, finely shredded with a knife
  • black pepper
  • kosher salt
  • 2 pounds spaghetti
  • optional: leftover zucchini or other summer vegetables
Preparation:

1. Bring 6 quarts of water to a boil and add 2 tablespoons of salt.

2. In a large saute pan, heat the olive oil over high heat until almost smoking. Lower the heat to medium-high and add the garlic cloves. Cook for 2 minutes, or until softened and slightly browned. Add the tomatoes, chives and basil and cook over high heat until the tomatoes are just beginning to burst. Season with salt and pepper.

3. Meanwhile, cook the spaghetti in the boiling water according to package directions until it is tender yet al dente. Drain the pasta and add it to the pan with the tomatoes. Toss over high heat for 1 minute, then divide evenly among four warmed pasta bowls and serve immediately.

Wednesday, June 20, 2007

recipe: corn chowder


Ingredients:

  • 6 tablespoons unsalted butter
  • 4 garlic cloves, minced6 shallots (or 1 small onion), chopped
  • 1 fresh jalapeno pepper, roasted (over a stove flame), peeled, seeded and minced
  • 2 cups chicken stock (if not homemade, use Swanson organic)
  • 6 cups corn kernels (frozen or fresh)
  • pinch of salt
  • 2 cups cream
  • chopped cilantro (for garnish)
  • sour cream (for garnish)
Directions:
Melt the butter in a large saucepan and saute the garlic and shallots until tender. Stir in the jalapeno pepper and cook a minute longer.

Add the stock and corn to the saucepan and bring to a boil. Reduce the heat and simmer for 5 minutes.

Using a potato masher, mash the soup to soften and break up the corn mixture. Season with salt and add the cream. Reheat thoroughly but do not allow the soup to come to a boil. Serve hot topped with cilantro and a dollop of sour cream.

*makes 4 dinner servings
*for a complete meal, serve with good bread and a simple green salad vinagrette

Source:
Martha Stewart Living Cookbook

Thursday, May 17, 2007

easy: homemade granola

As promised, here's an excellent granola recipe from Jonni McCoy's "Miserly Meals" cookbook (see books on right). We've tried several different recipes, including a fairly good one from Mark Bittman, but this version has the right amount of sweetness for us. It tastes very good with plain yogurt and will keep indefinitely if refrigerated in an air-tight container.

Once you try it you'll be appalled that grocery stores and co-op's charge so much for boxed or bulk granola....

not just for hippies

Granola
5 C. rolled oats
3/4 C. brown sugar
1/3 C. concentrated apple juice
1/2 C. nonfat dry milk
1/3 C. honey
2 T. cinnamon
1/2 tsp. salt
1/2 C. dried fruit
1 C. nuts (almonds, pecans, etc.)

Mix sugar, juice, dry milk and honey in saucepan and heat over medium heat only until sugar dissolves. Combine dry ingredients and fruit in mixing bowl. Pour sugar mixture slowly over dry mixture and blend well. Place on cookie sheet and bake at 375 degrees for 10-20 minutes, stirring every 10 minutes.

Options: Be creative by adding peanuts, sunflower seeds, coconut, sesame seeds, peanut butter, or whatever else your family enjoys.

Cost analysis (1 pound): homemade = $1.00 Store-bought = $2.39 or more

p.s. Speaking of Mark Bittman, I saw this article yesterday on NYT online. I'll bet one could eat very well in Istria on $60 dollars per week. Too bad it costs more than sixty bucks to get there...